HubSpot is known for being extremely user-friendly. The platform has been laid out with the customer in mind. Whether you’re creating a blog or building a complex workflow, there should never be that many stumbling blocks that get in the way.
The same principle goes when it comes to building a chatbot. It’s a pretty straightforward process. However, just to give you that extra bit of assurance moving forward, we’ve put together a blog which explains how to build a chatbot in HubSpot in five easy steps.
So, let’s get started and talk through each step one at a time…
1. Choosing which type of bot you want to use
Once you’ve entered your HubSpot account, you’ll need to navigate towards the conversations tab which is located at the top of the page. There should then be a chatflows option. Click here to begin building your bot.
The next step will be to decide which template you’re going to use. You’ll be presented with three different options. These include: Qualify leads bots, Book meetings bots and Support bots.
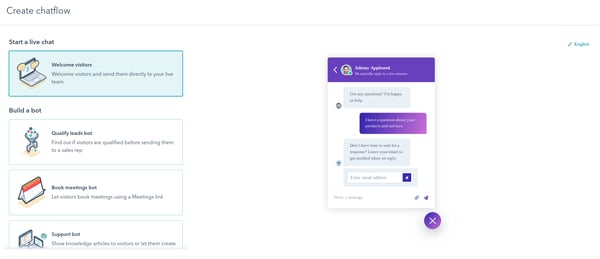
Which one you choose will completely depend on the goals of your bot and what you’re trying to achieve by setting one up. For example, if you’re looking for an alternative way to deal with customer queries, then you’d use a support bot.
You’ve built the foundations of your chatbot. Nice work. Now let’s move on to the next stage which involves creating a welcome message.
2. Creating a welcome message
Your welcome message is the first thing your customer will see when they land on your chatbot. This is your chance to set the scene. Be friendly and make sure that your bot offers some sort of value proposition.
In order to start creating your welcome message on HubSpot, you’ll need to click on the welcome message panel that opens on the right-hand side of the page. Now it’s time to get creative and write out your very own welcome message.
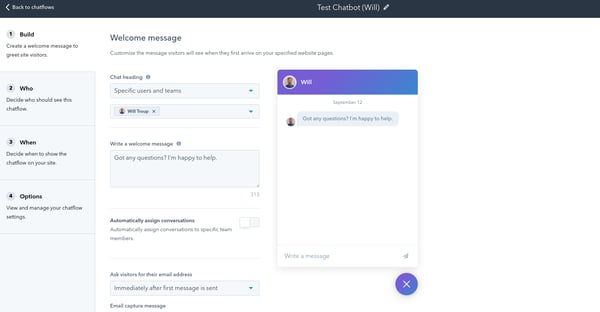
Let’s say you’ve decided to implement a ‘Book a meetings’ bot. Your bot’s welcome message may read something like “Hey there. Are you looking to book a meeting with one of our sales reps? Simply click a date on the calendar and we’ll get something arranged for you.”
Once you’re happy with your bot’s welcome message, you’ll then need to modify the actions of your bot. This process is similar to building a workflow as you’ll be using if/then branches to set up the flow of your conversation.
There are loads of different types of actions within HubSpot. Some include:
- Send a simple message.
- Ask a question.
- Offer an email subscription.
- Book a meeting.
For more information on bot actions and the different types which are available, why not check out this article from HubSpot?
3. Selecting a target audience
The next step involves specifying which visitors you want to see the chatbot widget on your website. You’ll be presented with four different options. The one you choose will link back to the goals of your chatbot.
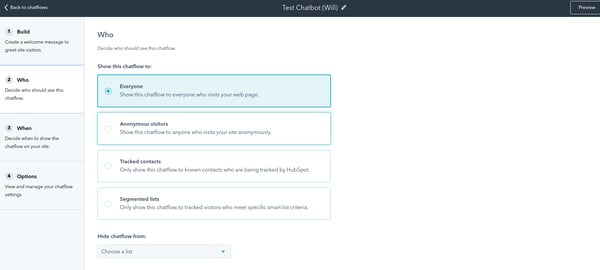
These four different options include:
- Everyone: This means that literally anyone who lands on your website will be able to see your chatbot. It doesn’t matter whether they exist in your HubSpot account already or not.
- Anonymous visitors: If you decide to choose this option, then your chatbot will only be available to untracked visitors. These people will not exist within your HubSpot account.
- Tracked contacts: These contacts will already exist within your HubSpot account. You’ll already have some of their details saved. If you choose this option, the chatbot will only be available to these people.
- Segmented lists: This option means that only tracked contacts who meet your smart list criteria will see your bot. Check out this HubSpot article for more information on smart lists.
4. Deciding when your chatbot should appear on a page
The chatbot build is almost done. There are just a few more steps to go through before you can start utilising your very own bot on your website. Step three of the build is deciding when your chatbot should appear on your website pages.
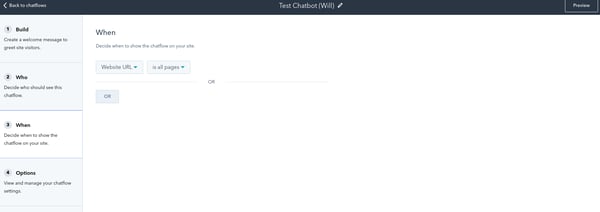
HubSpot allows you to trigger a chatbot to appear when a visitor loads a specific website URL, or when they load a URL that includes certain query parameters. Here’s how you can set up both:
Website URLs
If you’d like your chatbot to appear on specific website URLs, you’ll need to select the Website URL option on the dropdown menu and then decide on a targeting rule for that specific URL. These include: all pages, is, isn’t, contains, doesn’t contain, starts with or doesn’t start with.
For example, you may want your chatbot to appear on every page on your website. If that’s the case, you would select starts with and then type in https://www.digital22.com.
Query parameters
Query parameters are a defined set of parameters which are attached to the end of a specific URL. If you’d like to use one of these instead of a website URL, you’d select the Query param option and follow the exact same process as above.
For example, you may want your chatbot to only appear on your blog pages. You would then select starts with https://www.digital22.com/insights.
5. Customising your bot’s display options
So you’re now at the last part of the bot build. The final stage involves selecting the different display options of your chatbot. This includes things like giving your bot a name, uploading a photo of your bot and selecting which language your bot will talk in.
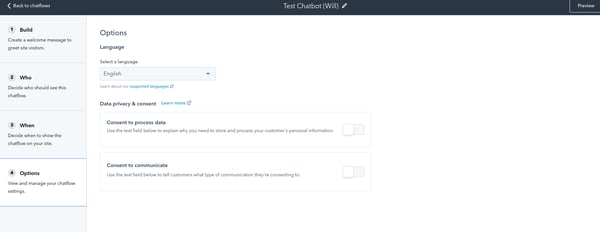
You’ll also be able to add in session timeouts and typing delays between messages. Oh, and also don’t forget to capture visitors' content to process data by including a GDPR button on your bot too.
I know, I know, GDPR is a bit of a touchy subject. Here’s a really helpful article which provides a load of tips on how to ensure that your GDPR settings are set up correctly in your HubSpot account.
There you have it. Your very own bot has now been built in HubSpot. However, in order to make sure that you’re making the most out of it moving forward, you need to be up to speed with all things conversational marketing to make your next strategy a success.
Download our conversational marketing playbook
The value of having an effective conversational marketing strategy in place can be huge for your business. It allows you to put the customer at the heart of all your business operations and create the added value which will ultimately make you stand out from the competition.
We’ve put together a playbook which covers everything you need to know about the concept, from how to get started to the best practices to keep in mind. Download your free copy now using the link below.


